- Install quick-start
- Building Cufflinks from source
- Common uses of the Cufflinks package
- Using pre-built annotation packages
Install quick-start
Installing a pre-compiled binary release
In order to make it easy to install Cufflinks, we provide a few binary packages to save users from occasionally frustrating process of building Cufflinks, which requires that you install the Boost libraries. To use the binary packages, simply download the appropriate one for your machine, untar it, and make sure the cufflinks,cuffdiff and cuffcompare binaries are in a directory in your PATH environment variable.
Building Cufflinks from source
In order to build Cufflinks, you must have the Boost C++ libraries (version 1.47 or higher) installed on your system. See below for instructions on installing Boost.
Installing Boost
- Download Boost and the bjam build engine.
- Unpack bjam and add it to your PATH.
- Unpack the Boost tarball and cd to the Boost source directory. This directory is called the BOOST_ROOT in some Boost installation instructions.
- Build Boost. Note that you can specify where to put Boost with the –prefix option. The default Boost installation directory is /usr/local. Take note of the boost installation directory, because you will need to tell the Cufflinks installer where to find Boost later on.
- If you are on Mac OS X, type (all on one line):
bjam --prefix=<YOUR_BOOST_INSTALL_DIRECTORY> --toolset=darwin architecture=x86 address_model=32_64 link=static runtime-link=static --layout=versioned stage install- If you are on a 32-bit Linux system, type (all on one line):
bjam --prefix=<YOUR_BOOST_INSTALL_DIRECTORY> --toolset=gcc architecture=x86 address_model=32 link=static runtime-link=static stage install- If you are on a 64-bit Linux system, type (all on one line):
bjam --prefix=<YOUR_BOOST_INSTALL_DIRECTORY> --toolset=gcc architecture=x86 address_model=64 link=static runtime-link=static stage installInstalling the SAM tools
- Download the SAM tools
- Unpack the SAM tools tarball and cd to the SAM tools source directory.
- Build the SAM tools by typing make at the command line.
- Choose a directory into which you wish to copy the SAM tools binary, the included library libbam.a, and the library headers. A common choice is /usr/local/.
- Copy libbam.a to the lib/ directory in the folder you’ve chosen above (e.g. /usr/local/lib/)
- Create a directory called “bam” in the include/ directory (e.g. /usr/local/include/bam)
- Copy the headers (files ending in .h) to the include/bam directory you’ve created above (e.g. /usr/local/include/bam)
- Copy the samtools binary to some directory in your PATH.
Installing the Eigen libraries
- Download Eigen
- Unpack the Eigen tarball and cd to the Eigen source directory.
- Copy the Eigen/ subdirectory someplace on your system where you keep header files (e.g. /usr/local/include)
Building Cufflinks
Unpack the Cufflinks source tarball:
tar zxvf cufflinks-0.7.0.tar.gzChange to the Cufflinks directory:
cd cufflinks-0.7.0Configure Cufflinks. If Boost is installed somewhere other than /usr/local, you will need to tell the installer where to find it using the –with-boost option. Specify where to install Cufflinks using the –prefix option.
./configure --prefix=/path/to/cufflinks/install --with-boost=/path/to/boost --with-eigen=/path/to/eigenIf you see any errors during configuration, verify that you are using Boost version 1.47 or higher, and that the directory you specified via –with-boost contains the boost header files and libraries. See the Boost Getting started page for more details. If you copied the SAM tools binaries to someplace other than /usr/local/, you may need to supply the –with-bam configuration option. Finally, make and install Cufflinks.
make
make install
Testing the installation
- Download the test data
- In the directory where you placed the test file, type:
cufflinks ./test_data.samYou should see the following output:
[bam_header_read] EOF marker is absent. The input is probably truncated.
[bam_header_read] invalid BAM binary header (this is not a BAM file).
File ./test_data.sam doesn't appear to be a valid BAM file, trying SAM...
[13:23:15] Inspecting reads and determining fragment length distribution.
> Processed 1 loci.                            [*************************] 100%
Warning: Using default Gaussian distribution due to insufficient paired-end reads in open ranges.
It is recommended that correct paramaters (--frag-len-mean and --frag-len-std-dev) be provided.
> Map Properties:
>       Total Map Mass: 102.50
>       Read Type: 75bp x 75bp
>       Fragment Length Distribution: Truncated Gaussian (default)
>                     Estimated Mean: 200
>                  Estimated Std Dev: 80
[13:23:15] Assembling transcripts and estimating abundances.
> Processed 1 loci.                            [*************************] 100%
Verify that the file transcripts.gtf is in the current directory and looks like this (your file will have GTF attributes, omitted here for clarity)
test_chromosome Cufflinks       exon    53      250     1000    +       .
test_chromosome Cufflinks       exon    351     400     1000    +       .
test_chromosome Cufflinks       exon    501     550     1000    +       .
Common uses of the Cufflinks package
Cufflinks includes a number of tools for analyzing RNA-Seq experiments. Some of these tools can be run on their own, while others are pieces of a larger workflow. The complexity of your workflow depends on what you want to achieve with your analysis. For a complete discussion of how Cufflinks can help you with your analysis, please see our protocol paper. The paper includes a diagram (Figure 2) describing how the various parts of the Cufflinks package (and its companion tool TopHat) fit together. As of version 2.2.0, you can also run Cuffquant and Cuffnorm to make large scale analyses easier to handle. The figure below is an updated version of Figure 2 showing how the two utilities released after the protocol paper appeared fit into the workflow:
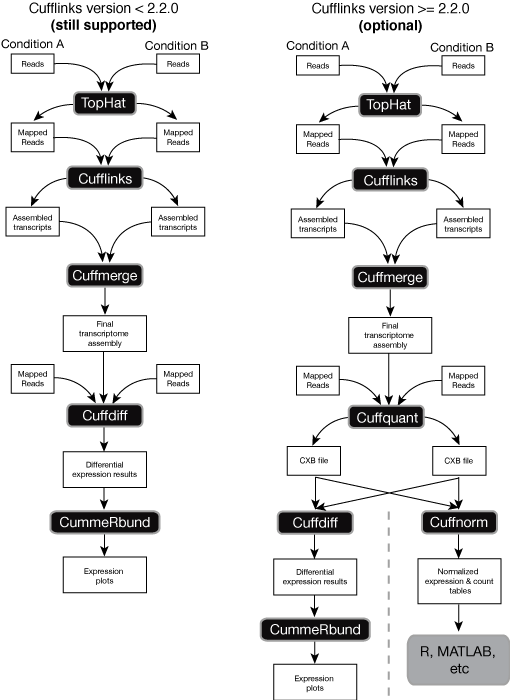
You can use Cuffquant to pre-compute gene expression levels for each of your samples, which can save time if you have to re-run part of your analysis. Using Cuffquant also makes it easier to spread the load of computation for lots of samples across multiple computers. If you don’t want to perform differential expression analysis, you can run Cuffnorm instead of Cuffdiff. Cuffnorm produces simple tables of expression values that you can look at in R (for example) to cluster samples and perform other follow up analysis.
Using pre-built annotation packages
A number of steps in the Tuxedo package work better if you have pre-existing gene annotations. How you can use these annotations is detailed in our protocol paper. Illumina has kindly provided a large number of annotation packages for commonly used model organisms and humans. You can find these packages here.